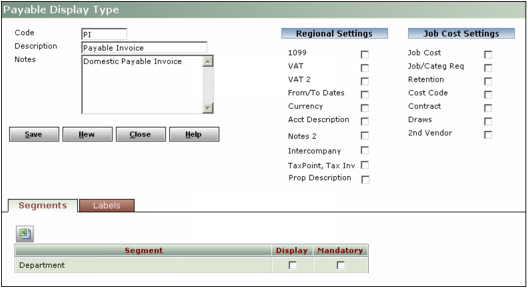
Display types determine which fields appear on the Invoice Register and Payable Invoice screens. You can have as many display types as you need. Defining display types allows you to select the appropriate screen configuration from the Display Type list on the Invoice Register and Payable Invoice screens.
|
1
|
On the PAYscan Administration side menu, select Setup > Display Settings > Payable Display Types > Add Display Types. The Payable Display Type screen appears.
|
|
3
|
Click Save.
|
|
VAT If you have Voyager International Property Management, select this check box to display the VAT (Value Added Tax) field.
VAT 2 If you have Voyager International Property Management, select this check box to display the VAT2 (second Value Added Tax) field.
Currency If you have Voyager International Property Management, select this check box to display the currency field: Total Amount (with select currency list), Base Amount, Exch Rate, and Exch Rate Date.
Acct Description Displays the G/L account description.
Notes 2 This field label appears only if you have Voyager International Property Management. Select this check box to display the 2nd Note field.
TaxPoint, Tax Inv If you have Voyager International Property Management, select this check box to display the fields: Taxpoint Date and Tax Inv Number.
Prop Description Displays the property description.
|
|
|
If you have Voyager Construction Management, select those fields you want to display on the Invoice Register and Payable Invoice screens:
Job/Categ Req If you selected Job Cost and you also want to make the Job and Category fields required, select this check box.
2nd Vendor Select this check box to display the 2nd Vendor field. This is useful for writing joint checks. Printed checks are made out to the primary vendor and the 2nd vendor.
|
|
|
Segments tab
|
If you are using segmented accounting (other than intercompany), select the Display check box beside the segment you want included on the Invoice Register and Payable Invoice screens.
NOTE The segment PAYscan uses for intercompany does not need to be visible because PAYscan automatically assigns the intercompany segment (property code of the funded property).
|
|
Labels tab
|
To customize the field labels on the Invoice Register and Payable Invoice screens, complete this tab.
Header Notes To modify the Notes field label on the Invoice Register header and the Payable Invoice header, type the label you want to appear, beside Header Notes, in the Label field.
Detail Notes To modify the Notes field label on the Invoice Register, Details tab and the Payable Invoice, Details tab, type the label you want to appear, beside Detail Notes, in the Label field.
Detail 2nd Notes If you have Voyager International Property Management and you want to modify the 2nd Notes field label on the Invoice Register, Details tab and the Payable Invoice, Details tab, type the label you want to appear, beside Detail 2nd Notes, in the Label field.
Tax1 If you have Voyager International Property Management and you want to modify the Tax field label on the Invoice Register, Details tab and the Payable Invoice, Details tab, type the label you want to appear, beside Tax1, in the Label field.
Tax2 If you have Voyager International Property Management and you want to modify the Tax2 field label on the Invoice Register, Details tab and the Payable Invoice, Details tab, type the label you want to appear, beside Tax2, in the Label field.
|
|
1
|
On the PAYscan Administration side menu, select Setup > Display Settings > Payable Display Types > Review Display Type. The Payable Display Type filter appears.
|
|
2
|
|
4
|
Click Save.
|
